Building Docker Development Environment Using wsl2 in Windows 11
Hi, I’m Lovefield.
As I replaced my computer at home for the first time in a while, I had to reconfigure the development environment. Windows has been using it only for games and not for development. However, it was more cumbersome than I thought to develop by switching computers, and eventually, Windows decided to configure the development environment.
Docker also supported Windows, so I installed Docker Desktop at first without much thought. But Docker, which seemed to run well, didn't work properly. It just spits out the log of images I didn't find.
I looked up some information and found that if I installed Docker Desktop in Windows, it should have docker-desktop and docker-desktop-data mounted on the WSL. However, on my computer, only docker-desktop was mounted, and it didn't work properly in the end.
I was thinking about it, and I thought it would be better to install Ubuntu on the WSL and configure the development environment since Docker is also a system that is bitten by the WSL environment anyway. I put it into action right away and the results were more satisfactory than I thought. Except I struggled with authority issues in the middle. Let's install it now.
1. Install Windows Subsystem for Linux
1
wsl -l -vFrom Powershell, check the Windows subsystem for Linux using the above command. If you are prompted to do so, follow the instructions to install it.
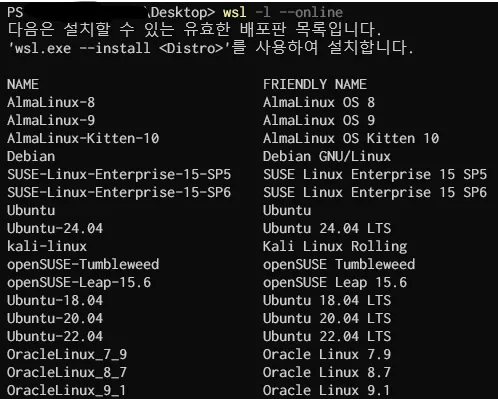
2. Check Ubuntu that can be installed
1
wsl -l onlineRun the above command to see the list that can be installed.
3. Install Ubuntu-24.04
1
wsl install Ubuntu-24.04Run the above command to install Ubuntu-24.04.
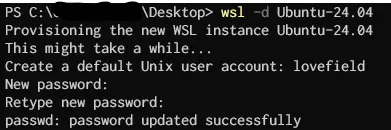
4. Mount Ubuntu
1
wsl -d Ubuntu-24.04Use the command above to mount Ubuntu to the WSL. Once the mount is complete, you will be asked for a username and password to use. When you complete the course, you are looking at where you ran Powershell on the mounted Ubuntu. Exit.

Once you go into the terminal settings, the profile has a new Ubuntu-24.04 on it. You can set it as your default profile and use it, and set the default shape to suit your personal preference.
5. Install Docker
Open a new terminal. Profile should be Ubuntu-24.04.
Run the following in order to install Docker and Docker compose.
1
2
3
4
5
6
7
8
sudo apt install ca-certificates curl
sudo install -m 0755 -d /etc/apt/keyrings
sudo curl -fsSL https://download.docker.com/linux/ubuntu/gpg -o /etc/apt/keyrings/docker.asc
sudo chmod a+r /etc/apt/keyrings/docker.asc
echo  "deb [arch=$(dpkg --print-architecture) signed-by=/etc/apt/keyrings/docker.asc] https://download.docker.com/linux/ubuntu $(. /etc/os-release && echo "${UBUNTU_CODENAME:-$VERSION_CODENAME}") stable" |  sudo tee /etc/apt/sources.list.d/docker.list > /dev/null
sudo apt update -y
sudo apt install -y docker-ce docker-ce-cli containerd.io docker-buildx-plugin docker-compose-plugin
When you are done, verify that the docker and docker compose are installed properly using the 'docker -v' and 'docker compose help' commands.
The port of the container uploaded as docker can be accessed from the window, so you can set the docker environment you want and use it!

Lovefield
Web Front-End developer
하고싶은게 많고, 나만의 서비스를 만들고 싶은 변태스러운 개발자입니다.

Configuring Multilingualism in Nuxt
Describes how to implement multilingualism without i18n in Nuxt.
Nuxt

Install Vim and set the default editor for Ubuntu
Install Vim and set the default editor for Ubuntu.
Server